![]()
Plant Dreams, Grow Gardens
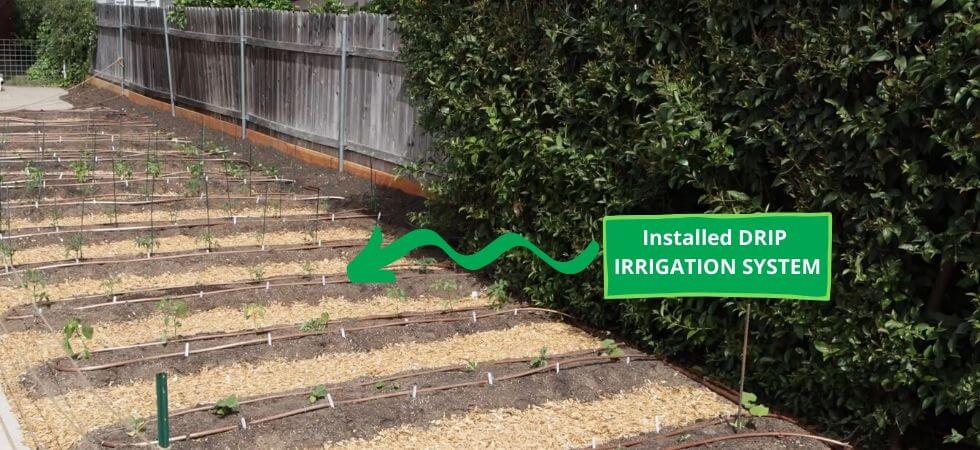
Most of us are lazy Greenhouse Gardeners, especially me. So the idea of automatically irrigating your Greenhouse Plants and Veggies that you have grown in raised beds without even worrying about them is very pleasing. But even if you are not a lazy gardener why not save the time and labor that you spend on manually irrigating your Greenhouse Raised beds. Today, I am taking the responsibility to guide and convince you for building your own DIY Greenhouse Drip Irrigation System.
Drip irrigation (also called Drip Line Systems) System is a form of an irrigation system in which water is applied to the roots of the plants through a network of tubes. Drip Irrigation Systems are very popular because of their high efficiency, better water conservation, and lower water bills as opposed to traditional watering techniques.
Majority of us think that Greenhouse Drip Irrigation System is costly, hard to build, and complex to operate. But, in reality, it’s very easy to build, very simple to maintain and it is one of the best technology that I can think of in Greenhouse gardening.
Believe me! by the end of this article, you will know exactly how you can build your own DIY Greenhouse drip irrigation system.
Note: Drip Irrigation systems inside the Greenhouse and outside the Greenhouse are not different, they are exactly the same. Therefore for this DIY greenhouse drip irrigation Guide, the example images that I am using are actually from an outside Drip Irrigation System installation. But! the main idea is the same so you should not be worried at all. Furthermore, I want to give a shout out to Kyle Hagerty from Urban Farmstead for allowing me to use the pictures and embed his video for a better explanation of the topic.
First! I will discuss the components that are required for building a DIY Greenhouse Irrigation system, then I will provide a step by step guide on how to connect these components. Finally, I will discuss some of the frequently asked questions about the Greenhouse Drip Irrigation system and whether you should spend money on Drip Irrigation systems.
We assume that you already own a greenhouse, but if you don’t have a greenhouse yet then don’t worry, I have written a complete detailed article on “How to Build a Greenhouse” that will help you build your own Greenhouse.
The first thing in installing your Greenhouse drip irrigation system is knowing about the components that you will be using for building DIY Greenhouse Irrigation System. The components that I am recommending makes the task of building the drip irrigation system very easy and cost-effective.
The Emitter Line of the Drip irrigation system is actually the perforated pipe that drips water into your Greenhouse Raised bed soil.
I recommend Buying 0.5″ Rain Bird XFD Dripline. The spacing between the emitters for this product is 12 inches ( 1 foot) and each emitter is capable of giving 0.9 Gallons per hour.
Depending upon the width of your Greenhouse Raised Bed you should decide how many parallel lines of emitters you want. I recommended using 9 to 12 inch spacing between the emitter lines.
So, if your greenhouse raised bed is 1-foot wide then you should use just 1 emitter line running along the center. If you have 2 feet wide raised bed use 2 emitter lines and space them 6″ (0.5 foot) from both ends of the raised bed. Do not run the emitter line close to your greenhouse raised bed end walls.
I have prepared this cool illustration which will give you some idea on how you can decide on installing Emitter lines for your DIY Greenhouse Drip Irrigation System.
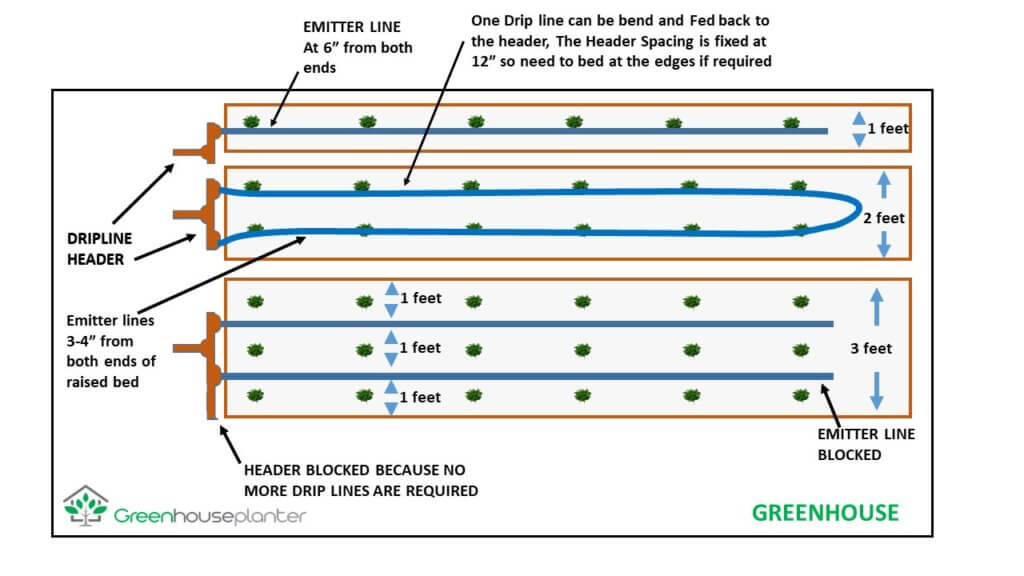
You can see in the illustration (Figure 1) above how you can connect your emitter line to the Drip Line header depended on the width of your greenhouse raised bed. The DripLine header is responsible for supplying water to emitters line of your greenhouse raised bed.
You have to block the far end of the emitter line. Check the 1 foot wide raised bed in Figure 1. The emitter line finishes at the right end of the greenhouse raised bed. Here, the emitter line will be blocked.
See Emitter lines for 2-foot and 3-foot wide raised beds, It’s your choice whether you want to block the emitter line at the far end or you want to bend it back and connect it to the Header line.
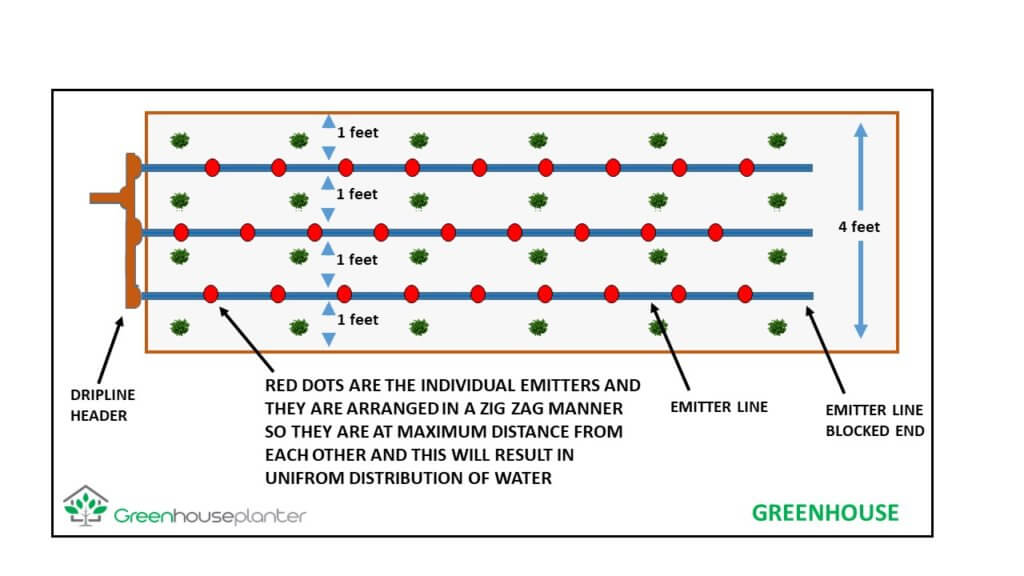
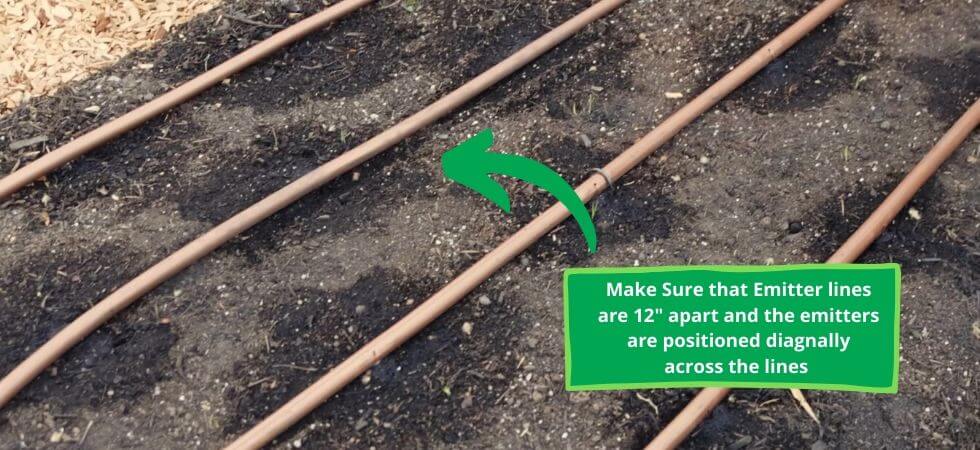
If you are going to block the drip line at the far end then you can easily position the individual emitters of two parallel emitter lines in a zigzag manner. So that the emitters are far apart from each other. This will water your greenhouse raised bed very uniformly (like in 4 feet wide raised bed shown in Figure 2).
Checkout the emitters in the illustration below. They are arranged Diagonally (zig-zag manner) so that the individual emitters on the drip line are separated far apart and the Greenhouse Raised bed will be watered uniformly.
On the other hand, if you want to bend the emitter line (drip line) back into the header line. This is easy to do and it will look very neat if you are planning to run this emitter lines exactly 12″ (1 foot) apart. However, if you are planning to decrease the spacing between emitter lines to be less than 1 feet (Maybe because your Greenhouse bed is narrow or you want much even water distribution) then I think two separate parallel emitter lines (with far end blocked) would look much neat and attractive. As far as the working is concerned both designs of the drip lines will work line.
Q1: Can I bury my DIY Greenhouse drip Irrigation lines under mulch.
You can bury the drip line under the mulch. All of the emitters on the drip line will work perfectly fine and they will not get clogged. You should definitely bury your DIY Greenhouse drip Irrigation lines under mulch if you are growing outside. However, we are discussing for greenhouses specifically.
Note: Adding mulch in your greenhouse bed is highly inadvisable because the greenhouse generally has a humid environment with little to no air movements. So adding much on Greenhouse raised beds is an invitation to pest, insects, and fungus to thrive in your greenhouse. So, don’t add mulch on your Greenhouse Raised beds.
Instead of using mulch, I would recommend using “DeWitt Sunbelt” ground cover fabric. Unlike other plastic fabric, This one is actually a woven plastic fabric. The good thing about this fabric is that not only it will prevent the weeds from going in your Greenhouse raised beds but I will also allow water to pass through the fabric and it will not block the oxygen to get into the soil like other cheap plastic film fabrics.
Q2: Should I install Greenhouse Raised bed Drip Irrigation System Under or Over Ground Conner Fabric.
Generally, with ground cover fabric it is important to install the drip irrigation system under the Ground Cover. Because most of the ground cover fabrics are made of plastic which doesn’t pass water. However, with the ground cover fabric that I have recommended above, you can install your drip irrigation system above the fabric because it allows the water to pass through it. Sill, I will highly recommend installing your DIY Greenhouse Drip Irrigation System cover under the ground cover fabric for a neat and better looking rased bed.
Q3: Do we Need to punch emitter on the Emitter line:
No, the Emitter line has pre-installed Emitters that drips water at 0.9 gallons per hours and they are 12″ apart. Actually 0.9 gallons per hour is adequate and it will work for any type of greenhouse raised beds. Therefore, you will never feel the need for punching more holes into the Emitter line.
Each of the emitters on the emitter line has a copper component and it aids in pressure compensation. It also helps to prevent the emitters from clogging and it also discourages bugs from getting into the emitter line.
So, this was all about the Emitter. lets discuss about the Header line, Now.
The header line is responsible for supplying water to the emitter lines. The header line that I recommend is also from Rain Bird company and it goes well with the Emitter line mentioned above. Use Rain Bird XQF Dripline Header, this header has 3/4″ diameter and has 12″ outlets spacing for connecting the emitter.
Depending on your greenhouse bed size, you have to choose how many emitter lines you want to connect with your header line. Cut the header line after the number of emitter-line outlets you want and block it at the other end.
You need to lay an underground 3/4″ water supply line to the corner of the raised bed you want to install a drip irrigation system. You can either use an underground 3/4″ PEX pipeline (I recommend using SharkBite U870R100 PEX Pipe 3/4 Inch) and connect it to the header line at the corner of the raised bed using a (3/4 inch coupler). The use of PEX type for supplying water to the raised is very simple and easy to implement.
If you have multiple raised beds you will be using PEX Tee fittings for this purpose to supply water to all of the raised beds. I will also recommend adding a separate valve (Sharkbite Ball Valve) for each of the raised beds. This will allow you with the flexibility of cutting and supplying water to each of the individual raised beds and believe me it will help a lot.
Another option is to install a PVC pipeline to the corner of your Greenhouse Raised bed. And then connect the Header line with the PVC pipeline.
Before feeding the water to the header line it is a good idea to filter out any particles that may clog the emitters on the drip line. For this purpose, I recommend using Drip Depot 3/4″ Filter this filter has a nominal flow rate of 10 Gallons per minute (not per hour) which is quite a lot. One thing I want to mention is that this device is not designed for continuous pressure so you should install this filter after the main tap or timer.
If you want to manually turn on and off your irrigation system then during every irrigation session you will have to turn on the main valve and then cut off the supply after an hour or more (depending on your requirement).
However, a better option will be installing a timer valve at the main supply. You can use Instapark Outdoor Waterproof Single-Outlet Timer for this purpose. You can program it to supply water to your Greenhouse plants automatically as per requirement.
We hope that you are getting tons of information from this DIY Greenhouse Drip Irrigation guide. We strongly recommend you, subscribe to our email newsletter, So you don’t miss out on our upcoming informative articles.
Lets, get into how you can build your DIY drip irrigation system for your greenhouse. I will be using an outdoor illustration on drip irrigation installment as shown in the figure below. But for the Greenhouse, the process is the same only you have to cut your header line according to the width of your greenhouse bed.
The first step in setting up the irritation system for your greenhouse raised bed is to provide water supply to the raised bed. You can use 3/4″ PEX tubing for this purpose as I have discussed above.
If you have more than one bed then lay out the PEX pipeline for each individual bed. I will also recommend adding a valve for each bed (as I have mentioned above).
The Next step is to install the connector to the water supply line that you have set at the corner of your raised bed. Check out the illustration below, in this illustration, a 3/4″ PVC T-joint is attached to two 3/4″ connectors. In this installation example, 2 connectors are used because the growing area for this installment was quite long so 2 header lines were used for a more uniform supply of water.
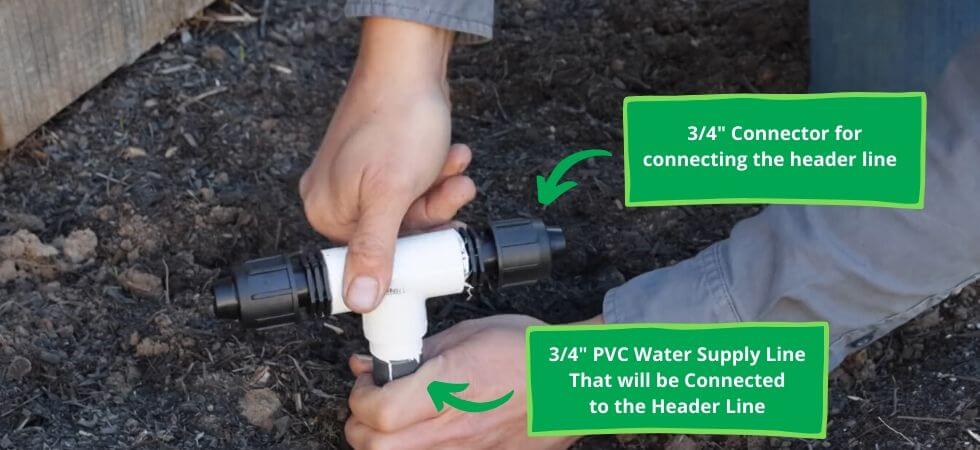
However, the width of the greenhouse raised beds is generally very small. So you should only connect One 3/4″ connector to the PEX pipeline at one corner of your raised bed.
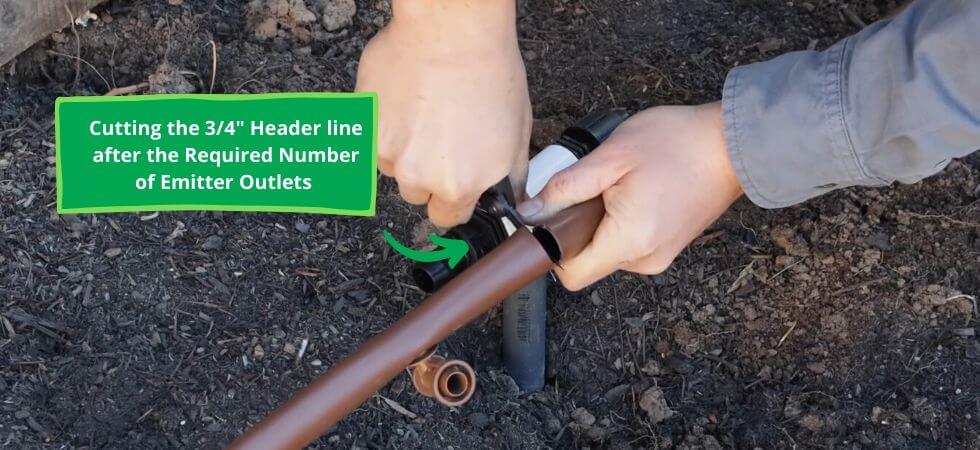
First, You should unroll the 3/4″ header line and then cut it to the number of emitter-line outlets you want for your greenhouse raised bed. The selection of the number of outlets depends on the width of your raised ( as discussed before).

Depending on the distance you want to keep between the emitter lines ( corner ones) and the raised bed edge. Cut the Header line accordingly so that the emitter line will be space at that particular distance from the side edge of your raised bed.
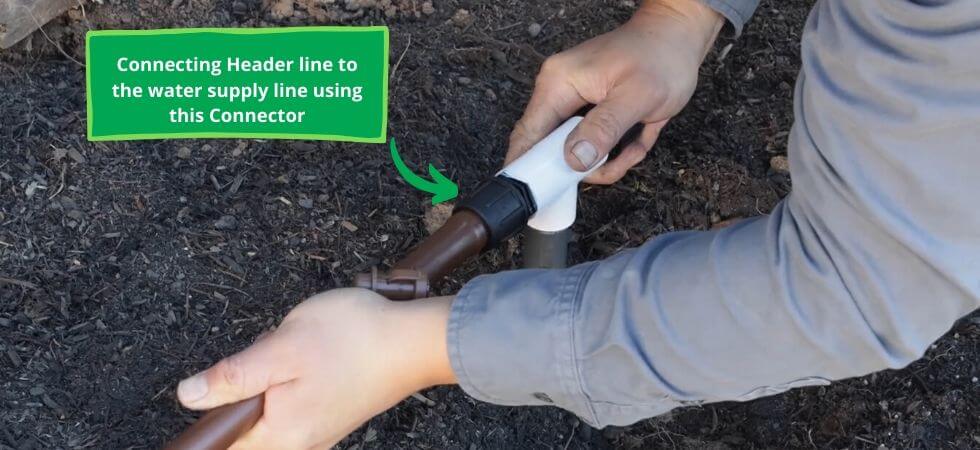
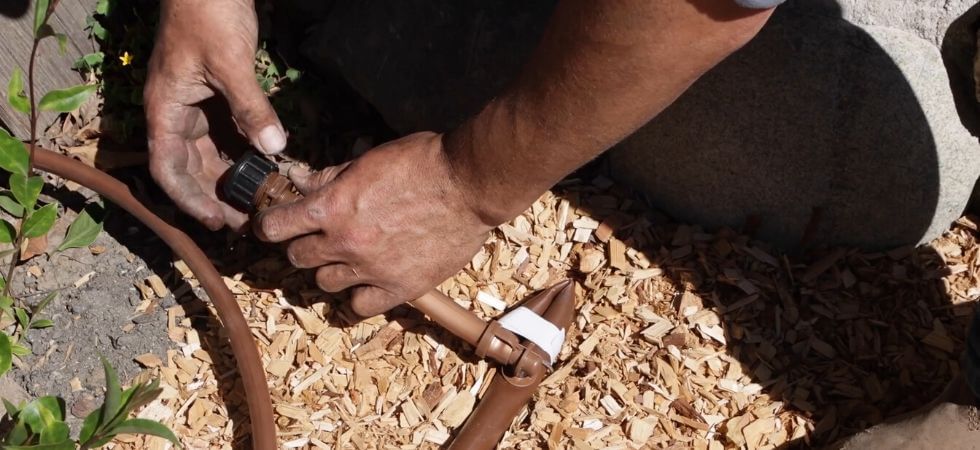
Push the header line in to the connector and tighten it
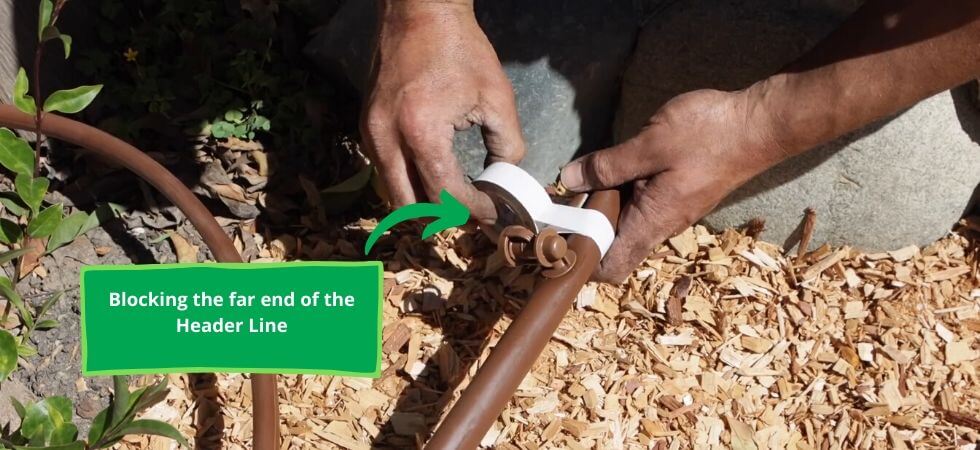
After you have connected the header line to the water supply block the far (other) end of the header line by just folding the pipe and warping tape around it to hold it in place.
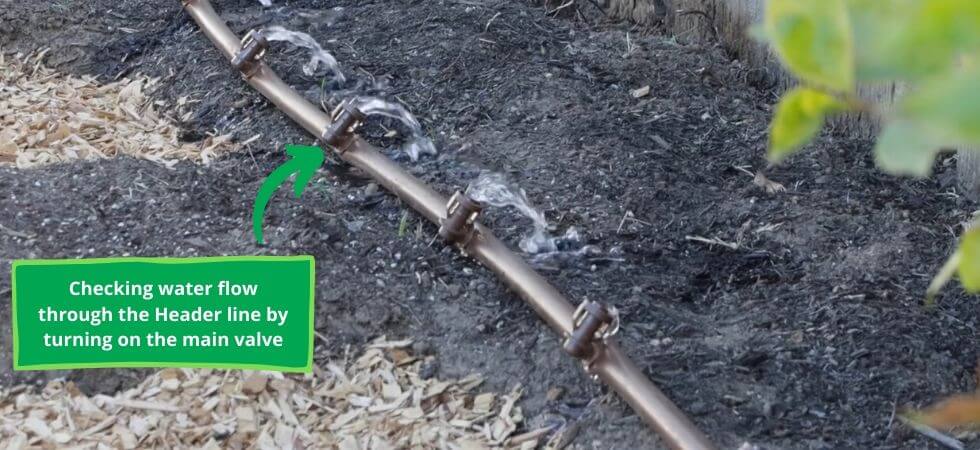
It is always a good idea to flush the header line of your irrigation system before installing the emitter line. This is because if there is any debris in the header line then it will be flushed and you will also be able to check whether all of the outlets on the header line are working correctly or not.
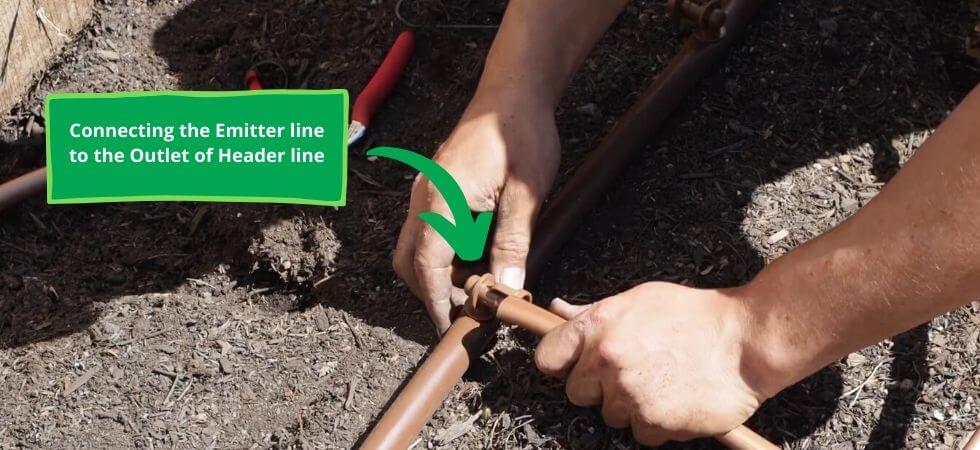
After you have installed the header line the next step is to connect the 1/2″ emitter line to the header line. You can just push the emitter line into the outlet of the header line.
As I have mentioned that the number of header outlets will depend on your bed size. If you have 2 header outlets for your bed then you can just curve the emitter line on the far end and feed it back to the next outlet of the header line.
Or you can run 2 emitter lines and block the lines at the far end by folding and taping them (as we have discussed in detail).
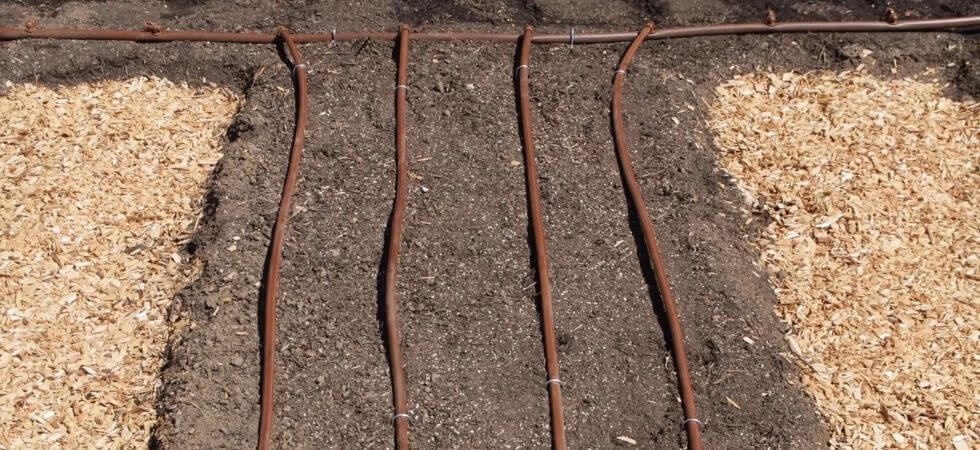
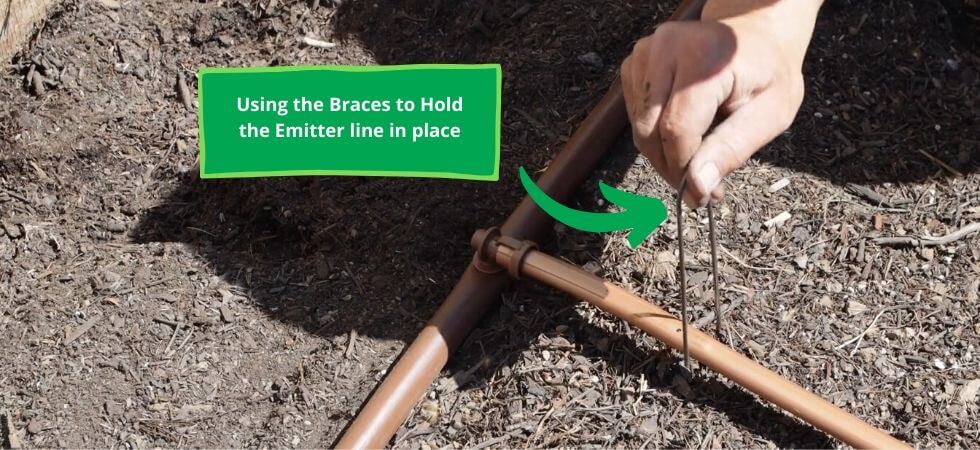
The next step is to secure the emitter and the header line using the braces, So they will not be displaced later on.
If you are installing a drip Irrigation system then you might consider installing drainage valves on to the header line. This is used to flush the header line when the growing season finishes because during winter when the temperature falls below the freezing point, water inside the tubing of the Drip-irrigation system will freeze and it will damage the pipes. Sometimes it is also used for flushing the header line.
However, inside the greenhouse adding a drainage valve is unnecessary because the temperature is always above freezing point. So, it’s up to you, whether you want the capability to drain your system or not. Personally, I don’t recommend connecting a drainage valve for your Greenhouse Raised Bed.
But, for outside installation, it is absolutely necessary. In order to install drainage value onto the header line. Leave one extra emitter outlet at the far end of the header line and connect it to the cap house through 1/2 inch flex tube.
Congratulations, you have now successfully installed your drip irrigation system. Now! you can just turn on your DIY Greenhouse Drip Irrigation system and sit back, relax, and enjoy watching greenhouse plants.
The entire process of installing a drip irrigation system is demonstrated by Kyle in his YouTube video given below. You can also check out his channel URBAN HOMESTEAD for more gardening videos.
Finally! lets discuss some of the frequently asked Questions about Greenhouse Drip Irrigation systems.
Q: How does a Greenhouse drip irrigation system compare to an above ground sprinkler?
A: Drip irrigation system soaks the ground with emitter lines instead of spraying a planted area above ground. These emitter lines have very small holes and it delivers water directly to the base of the plants by slowly leaking out water drop by drop. This irrigation system is best suited for raised beds or ground beds.
Q: What are the benefits of Greenhouse drip irrigation?
A: The best thing about the Greenhouse drip irrigation system is that it is a more water-efficient system than the sprinklers system. Instead of spraying water over a large area (like in sprinkler systems), a drip irrigation system soaks the soil directly around the plants. Hence, there is no water wastage in the form of runoff, over-spraying, or evaporation. Furthermore, the drip line emits water at a much slower rate for a long period of time this allows the roots of the plants to absorb more water over a longer period of time. This also helps to reduce overwatering that encourages mold to grow on the roots of the plants.
Q: How much will I save on my water bill by having a Greenhouse Drip Irrigation System?
A: Drip irrigation systems emit water at a much slower rate (0.9 gallons per min for our case). Each raised bed will require different amounts of water depending on the size and the soil composition, shade, and plant selection. However, slower water rates and higher efficiency of drip irrigation can reduce water usage by 50%.
Q: Is a drip line irrigation system difficult to install?
A: Not at all, the drip irrigation system that I have suggested is very easy to install and everyone can install it without any previous knowledge of plumbing.
Q: What are the maintenance requirements for drip irrigation?
A: If you have installed your drip irrigation system outdoors then you will be required to undergo seasonal maintenance. You will have to winterize your system before the temperature falls below 0. In this process, the supply of water is turned off in the header and emitter lines, and air is blown into the pipes to get the water out of the system in order to prevent the damage that can be caused by freezing. Then during the spring when the new season starts you need to turn the water back on.
However, for greenhouses, this is not the case you can leave the water in the drip line system when outside its actually freezing, This is one of the best things about growing in a greenhouse.
Q: How many hours per session should be given to the plants?
A: Depending on your soil composition, plant type, and climate you might give your plants 1+ hour of water per session and you might give 1 to 2 sessions per week. However, The best thing which you can do is keep examining your soil and decide accordingly.
Q: Is it worth spending money on installing DIY greenhouse drip irrigation system?
Definitely, go ahead and install a drip irrigation system for your greenhouse raised beds. If you are hesitant or you are not clear whether you should install it or not, then I will say, just install a drip irrigation system for 1 small raised bed in your greenhouse (just test it). I hope you will then go for installing a drip irrigation system for all of your greenhouse raised beds.
I hope you enjoyed this tutorial, It would be awesome if you share this article with your friends. Thanks 🙂
Comments are closed.
[…] DIY Greenhouse Automatic Irrigation System […]